Chapter 0 — Getting Started
0.0. How to succeed in this course
Welcome! This course is meant to empower you with programming skills to accomplish research goals as a cognitive scientist. The first half of the course is essentially an introduction to the Python programming language, while the second half guides you through various research applications thereof.
Alas, this is not a typical lecture course. Knowledge is not poured into you via Powerpoint slides and then expected to be regurgitated on-demand in exams. Rather, this is a skill-focused course: you ingest information outside of class hours (hence the online textbook) and then deliberately practice what you have learnt during class hours via guided exercises, with the overarching goal of cultivating mastery over a fickle sort of applied creative logic (i.e., programming).
Why learn to program
There are myriad skills one can learn in this life — sailing, skiing, singing, and so forth — but some are more essential than others when it comes to navigating society or joining the workforce. For example, our society heavily values literacy (basic reading and writing skills) and numeracy (basic math skills), so we spend many years in compulsory education drilling these abilities into children. Programming, or coding, is something like a blend between these two important skillsets, akin to a mix between creative writing and brute mathematical logic. It is also a skill that is becoming increasingly important over time. Some would argue that, with the advent of advanced artificial intelligence techniques, programming will become less important, to the point that software development jobs will disappear. I disagree — if anything, AI will only make it more important to be able to program as it is incorporated in some way into more and more jobs. After all, ubiquitous text-to-speech and word processing technologies have not obviated literacy. On the contrary, they have made reading and writing even more useful skills to have in one’s arsenal, as they allow you to operate with more flexibility and efficiency than ever before. So, too, is it with coding — even a little knowledge of programming can go a long way towards increasing your capabilities, including within roles that are not traditionally believed to involve software development. I believe that anyone, anywhere, in any job — be they middle managers, HR practitioners, librarians, artists, and so on — can benefit from knowing how to leverage logic to achieve their ends, in much the same way that everyone can benefit from knowing how to read, write, and do basic arithmetic.
Today, the fruits of programming can be seen all around you. From critical banking infrasture that allows you to transfer money within seconds; to clever phone games that delight millions of users; to the cutting edge science that we perform at the university — all of it is made possible by typing simple logical statements into our computers. By the end of this course, you, too, will be able to create little miracles with the application of focused thought and patience!
There are many ways to program, and many languages with which you can bring your visions to life. This course is specifically designed to help train you in the ways of scientific computing using what is arguably the most powerful and commonly used language within the field today — Python. As an added bonus, this language is pluripotent. You can run with it in almost any direction you choose, from web development to finance, and its syntax is simple enough that it acts as a great “gateway” language; learning other languages becomes easier once you know this one. But first, how can we best learn the language (and thereby succeed in this course) in the first place?
Helpful strategies
Programming is a skill that requires consistent practice and engagement. Based on past experience teaching this course, students who excel share several key behaviors. Here’s what will help you:
Read the material before class
Students who consistently read the assigned material before coming to class have significant advantages —
- Familiarity with concepts: When you’ve already encountered the ideas, class time becomes an opportunity for training and reinforcement rather than introduction. Reading the material during class is not a good use of time.
- More productive questions: Pre-reading allows you to identify what you don’t understand and ask specific questions.
- More time for practice: You can focus on the exercises and practice, practice, practice rather than trying to learn the concepts from square one.
Even if you don’t fully understand everything you read, exposure to the concepts beforehand will give you time to digest them and ask better questions during class.
Start assignments early
The most successful students in this course:
- Begin assignments immediately after they’re assigned, not the day before they’re due
- Work incrementally on assignments over multiple days
- Embrace the “get something working” approach rather than trying to write perfect code from the start
- Have time to ask for help when they encounter problems
Programming assignments often take longer than you expect — even when you account for the fact that they take longer than you expect! Start early to avoid last-minute stress.
Take good notes
Although I have written a lot for you here, you will have to do some writing, too. Take notes! Active note-taking significantly improves retention and understanding.
- Write code samples in your notes. If you don’t like to take notes digitally, that’s okay; write them by hand.
- Document error messages you encounter and how you fixed them. Keep a record of your debugging process.
- Create your own examples of concepts to ensure you understand them.
- Maintain a personal “cheat sheet” of syntax and commands you find useful. We often call these “snippets” in programming.
Your notes should focus on what you find confusing or want to remember, not just copying what’s presented.
Experiment constantly
Programming is a skill. It is learned by doing, not just reading or watching. You can’t learn to sing, swim, skate, or ski just by watching YouTube videos, and programming is the same way. As a rule of thumb: for every one hour you spend reading this textbook, watching YouTube videos, or otherwise passively consuming programming content, you should spend at least three or four hours actively coding. You don’t have to code for multiple hours all at once, but it helps to code in chunks of at least 1 hour in length, because it takes time to get into the flow.
- Try variations of the examples throughout the book to see what happens. Under most circumstances you can’t really break your computer, so don’t be afraid to experiment.
- Break things deliberately to better understand error messages.
- Build small test programs to isolate concepts you’re struggling with.
- Combine different concepts to create something new.
The most efficient way to learn programming is to spend time actively coding, making mistakes, and fixing them. Embrace the struggle!
Code along with the examples
As alluded to above, this book is written with many, many snippets of code embedded in the text. While reading, it is helpful to have an code editor (e.g., VS Code) open alongside the text, so you can copy-paste the examples into your own Python script and run them to see the results. Experiment by making modifications to the code, hypothesizing about the results, and updating your beliefs based on the results.
Ask questions strategically
When you get stuck:
- Try to solve it yourself first — this builds problem-solving skills
- Be specific about what you’ve tried and what isn’t working
- Prepare code examples that demonstrate your problem, stating the expected outcome, what the current (failed) outcome is, and any hypotheses you have about what might be going wrong.
- Read error messages carefully — they often tell you exactly what’s wrong.
Remember that being confused is perfectly normal when learning programming. Asking good questions is a skill that distinguishes successful programmers.
Collaborate appropriately
Working with others can accelerate your learning!
- Explain concepts to classmates — teaching reinforces your own understanding
- Discuss approaches to solving problems (without sharing code directly)
- Form study groups to review material together
However, ensure all work you submit represents your own understanding. Simply copying someone else’s (or, worse yet, an AI’s) solution deprives you of the learning experience, and leaves you dependent on others. Just as you wouldn’t want to rely on text-to-speech programs to read the product labels at the grocery aisle, refrain from relying on the machine to do your programming for you.
Submitted code must run without errors
Before you submit any code whatsoever, make sure it runs! If the code doesn’t run/results in an error, it will not be graded. It is better to have a partial solution that runs than an attempted solution that doesn’t run at all. In the event that you have tried your best, asked for help, and yet still cannot complete the assignment in time, you can always comment out the problematic code in order to submit your partial solution. Do not let perfect be the enemy of good.
Maintain a growth mindset
七転び八起き
Fall down seven times, get up eight times
— Japanese proverb
Programming can be challenging, but:
- Everyone struggles at first — this is normal and expected. I was horrendous at programming when I first started.
- Errors are learning opportunities, not failures
- Skills improve with practice — what seems impossible to you now can become routine, if not automatic
- Focus on progress, not perfection
Remember that professional programmers spend much of their time debugging and learning new things. And even if you’ve spent many years programming, you will still struggle, turning to Google, Stack Overflow, and even AI for help (albeit responsibly). The struggle is part of the process for everyone, not just beginners.
0.1. A Gentle Introduction to Your Computer
Before we dive into programming with Python, it’s essential to understand how your computer is organized and how to navigate it effectively. This knowledge forms the foundation for everything we’ll do in this course. Even if you think you already know how to navigate your computer, I would encourage you to finish reading this chapter, as you may be surprised to learn a thing or two.
The Basics of Computer Organization
Your computer stores information in a hierarchical system of files and folders (also called directories). Understanding this organization is crucial for programming, as you’ll need to navigate between different locations to create, modify, and run your code.
Files and Folders
- Files are individual documents that contain data. They can be text documents, images, programs, or any other type of data. Files almost always have a name followed by an extension (like
.txt,.py, or.jpg). This extension tells your computer what type of file it is, which determines how it should be opened and what program should be used to work with it.- By default, your operating system may hide the file extensions, so you may need to change yoursettings to expose them — more on this below.
- Folders (aka directories) are containers that can hold files and other folders, helping you organize related files together. Folders do not have extensions.
File System Hierarchy
Your computer’s file system is organized hierarchically, starting from a root directory and branching out from there.
- On Windows, the root is typically represented by drive letters like
C:\ - On Mac/Linux, the root is represented by a forward slash
/
From the root, your file system contains several standard folders:
- Windows:
C:\Users\YourUsername\contains your personal files - Mac:
/Users/YourUsername/contains your personal files - Linux:
/home/YourUsername/contains your personal files
About placeholders
Throughout this course, we will make extensive use of placeholders. For example,when you see YourUsername in a path — or similarly vague terms like project_name, my_variable, filename, destination and so on — you should replace it with the information that is relevant to your situation. For example, if your username is “alex”, the Windows path would be C:\Users\alex\. Use your discretion, as these are templates for you to adapt to your specific situation.
Your personal directory (often called your “home” directory) contains folders like Documents, Downloads, Desktop, etc.
File Paths
A file path is like an address that tells your computer exactly where to find a file or folder. There are two types of paths:
- Absolute paths start from the root directory:
- Windows:
C:\Users\YourUsername\Documents\project\code.py - Mac/Linux:
/Users/YourUsername/Documents/project/code.py
- Windows:
- Relative paths start from your current location (as in, where you currently are in the file system; if this is confusing, this will make more sense when we talk about the terminal).
- For example, if you’re already in your Documents folder, the relative path to the same file would simply be
project/code.py - And if you’re at your home directory, the relative path to the same file would be
Documents/project/code.py
- For example, if you’re already in your Documents folder, the relative path to the same file would simply be
Notice that Windows uses backslashes (\) while Mac and Linux use forward slashes (/) in their file paths. When writing code, you’ll often use forward slashes, even on Windows, as most programming languages interpret them correctly.
It is generally good practice to use relative paths when writing code, as this makes your code more portable. Use absolute paths only when absolutely necessary.
File Extensions and Types
File extensions are suffixes at the end of a filename that indicate the file type, and therefore the type of data that the file contains. This also determines the program that should be used to open it. Here are some common file extensions:
.txt— (Plain) text file.csv— Comma-separated values file (often used for data).- CSVs are a form of tabular data, and are often opened in spreadsheet software like Excel or Google Sheets for viewing and editing — at least, for most typical use cases.
.json— JavaScript Object Notation file (often used for data).py— Python script.html— Web page. Can be opened in a web browser..jpg,.png— Image files.docxor.doc— Microsoft Word document.pdf— PDF document.exe— Executable file (Windows). Opened directly by the Windows operating system to run the program it contains.- And many, many, many more…
While programming in this course, you’ll primarily be working with .py files (Python scripts); .txt, .csv, and .json files (for data); and .md files (for documentation). With very few exceptions, every file should have an extension. If you have created a file without an extension, you can add one by right-clicking the file and selecting “Rename”, then type out the extension you need (e.g., .py).
Using Your Computer’s Interface
While we’ll be using the terminal extensively in this course, it’s good to understand both ways of interacting with your computer:
- Graphical User Interface (GUI): The visual way to interact with your computer using windows, icons, and a mouse.
- Command Line Interface (CLI): Text-based interaction via the terminal, which we’ll cover in the next section.
The GUI is more intuitive for beginners, but the CLI offers more power and flexibility — essential skills for programming.
Where appropriate, I will provide parallel instructions for Mac and Windows. If you are on a Mac, you can ignore the Windows-specific instructions, and vice versa. Do not try to do both sets of instructions at once on the same computer.
Navigating the File System Graphically
The most common way to navigate the file system is to use your operating system’s dedicated Graphical User Interface (GUI) tool. On Windows, you would use File Explorer; on Mac, Finder. Below are some screenshots of how this looks on the two operating systems. You can double click on a folder to open it (i.e., explore its contents). The same goes for files, which will open with the default program associated with that file type.
Here’s how the Finder window looks on Mac: 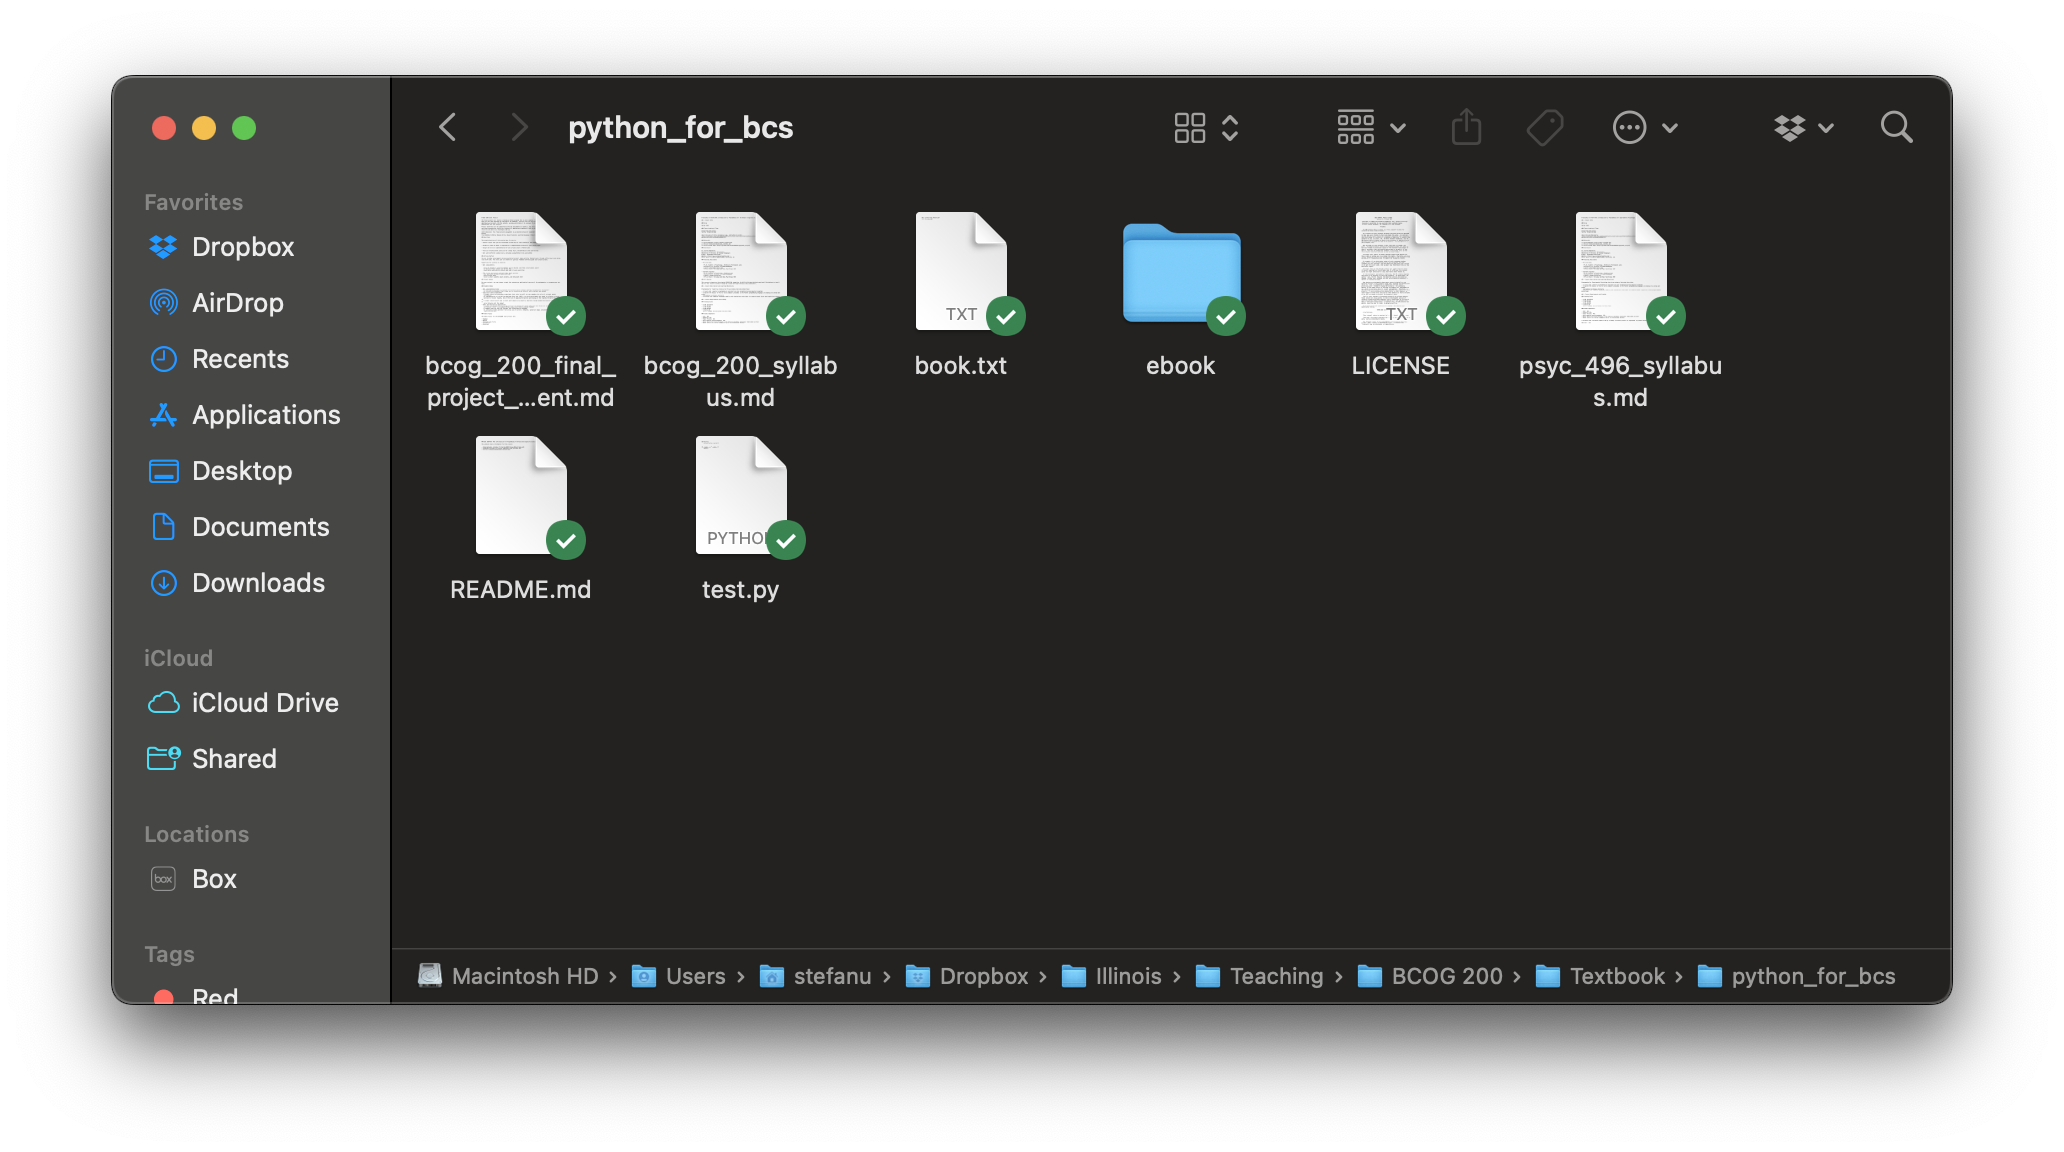
And here’s how the File Explorer window looks on Windows: 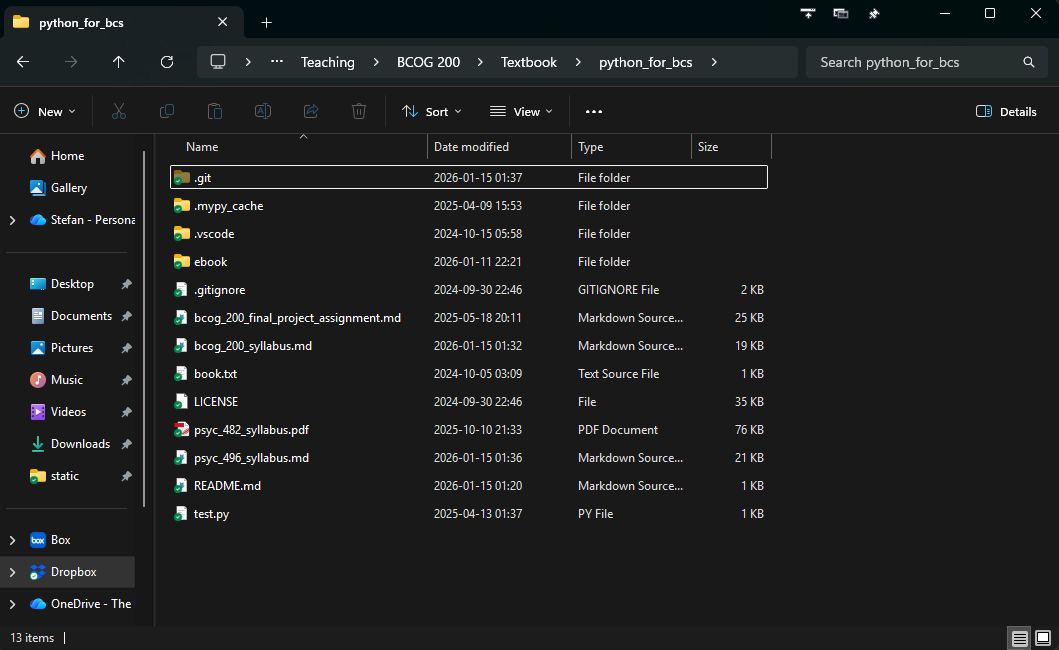
Showing File Extensions
By default, your operating system likely hides file extensions. It’s important to make them visible for programming.
On Windows:
- Open File Explorer
- Click on the “View” tab
- Check the box for “File name extensions”
- While you’re at it, also check “Hidden items”

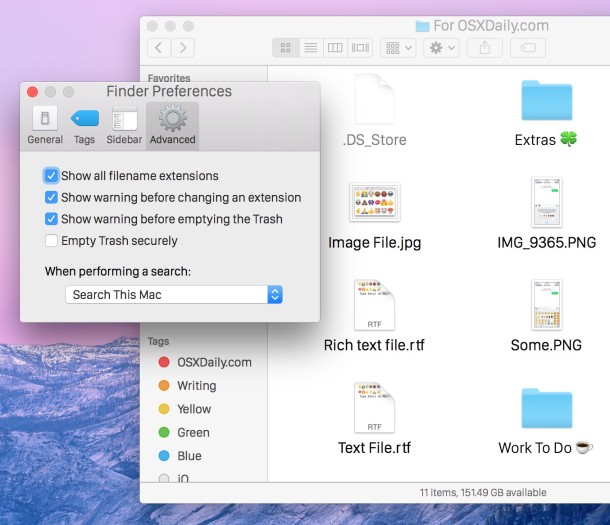
On Mac:
- Open Finder
- Click “Finder” in the menu bar, then “Settings” (or “Preferences” in older versions)
- Go to the “Advanced” tab
- Check “Show all filename extensions”
- To show hidden files at any time, press Cmd + Shift + .
We’ve encountered our first keyboard shortcut! When you see a shortcut like Cmd + Shift + ., it means you can press all three of these keys at the same time to achieve some result. (Of course, I’m not asking you to press the + key — we are using “+” to mean “and” in this instance.) This approach is often faster than clicking through your computer’s GUI, and we will use many more shortcuts throughout this course.
Project Organization
Good organization of your programming projects will save you time and frustration. Here’s a basic structure to follow:
project_name/
│
├── main.py           # Main script to run your program
├── data/             # Folder for any data files
│   └── input.txt     # An example data file
│
├── modules/          # Folder for your Python modules
│   └── helper.py     # A helper module
│
└── README.md         # Documentation explaining your project
For this course, you’ll want to create a dedicated folder for all your work. We recommend creating a folder with a name like bcog200 on your Desktop or in your Documents folder. This will make it easier to find your work later. Within that folder, you will probably want to have separate subfolders for the different types of work you will do in this course. For example, Labs, Homeworks, and Project.
You can use this kind of structure as inspiration for organizing your digital life in general. For example, you might have a folder called Illinois that contains subfolders for each of your classes (e.g., bcog100, bcog200, psyc230), and then each of those classes would have subfolders for each unit of the course (which itself might have subfolders, and so on).
Exercise: Getting Set Up
Let’s make sure you understand the key concepts covered so far. Try answering these questions:
Path Analysis: Consider the path
C:\Users\student\Documents\bcog200\Labs\lab1.py- What is the absolute path to this file?
- If your current location is the
Labsfolder, what would be the relative path to this file? - If your current location is the
Documentsfolder, what would be the relative path to this file?
File Extensions: For each of the following files, identify what type of file it is and what program might be used to open it:
lecture_notes.txtanalysis.pyprofile_picture.jpgdata.csv
Understanding Placeholders: In the path
/Users/YourUsername/Documents/project_folder/, identify all the placeholders that would need to be replaced with actual values on your computer.Setting things up: Before moving on, make sure to complete the following steps:
- Create a folder somewhere on your computer (e.g., in your
Documentsfolder or on your Desktop) calledbcog200 - Inside this folder, create a new folder called
Labs, another new folder calledHomeworks, and another new folder calledProject - Inside of your
Labsfolder, create a new file calledlab1.py - Set your computer to show file extensions (and hidden items, if at all possible)
- Create a folder somewhere on your computer (e.g., in your
Take a moment to actually complete this exercise. Understanding these concepts now will save you a lot of time and frustration later!
0.2. The Terminal: Your Command Center
Earlier, we introduced the concept of files, folders, and navigating through your computer’s file system using the graphical user interface (GUI). Now, we’ll explore a more powerful way to interact with your computer: the terminal.
What is the Terminal?
The terminal (also called the command line or command prompt) is a text-based interface that allows you to control your computer by typing commands instead of using a mouse. While it might look intimidating at first, the terminal offers several advantages:
- Speed: Many tasks can be completed much faster using the terminal
- Power: Some actions are only possible via the terminal
- Automation: You can create scripts to automate repetitive tasks using the terminal
- Remote access: You can control computers that don’t even have a graphical user interface to begin with
Different operating systems have different default terminal applications:
- Windows: Command Prompt or PowerShell, but please do not use Command Prompt for this course, we will use PowerShell
- Mac/Linux: Terminal
Whenever I say “terminal” in this course, mentally substitute it with the terminal application for your operating system.
Opening the Terminal
Let’s start by opening the terminal on your computer.
On Windows:
- Press Win + R to open the Run dialog
- Type
powershelland press Enter, or - Search for “PowerShell” in the Start menu (i.e., press the Win key and type “powershell”)
- Again, please do not use Command Prompt for this course — it is verboten
On Mac:
- Press Cmd + Space to open Spotlight Search
- Type “Terminal” and press Enter, or
- Find Terminal in Applications → Utilities
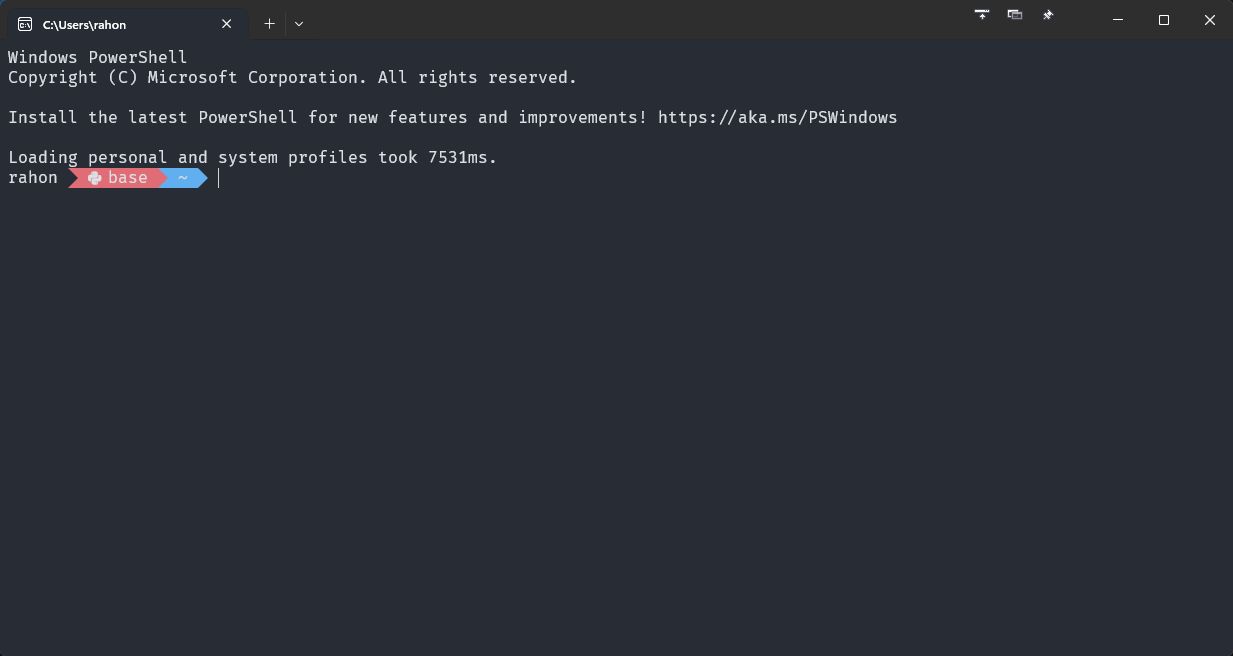
My terminals look a little different from the default, but the basics are the same. When you first open the terminal, you’ll see a prompt that looks something like this:
- Windows PowerShell:
PS C:\Users\YourUsername> - Mac/Linux:
YourUsername@ComputerName:~$
This prompt indicates that the terminal is ready to accept commands. The text before the > or $ symbol shows your current location in the file system.
You may have noticed that the screenshot(s) of my terminal(s) look different from yours. This is because I am using different terminal applications with custom settings that take a little time and energy to set up. If you are interested in diving deep into terminal customization, I recommend using Windows Terminal, Tabby or WezTerm on Windows, and Ghostty on Mac. For theming, I’d recommend Oh My Posh for any system, or Oh My Zsh on Mac. This Windows Terminal setup guide still works well as of 2025.
Understanding Commands
In the terminal, you enter commands to tell your computer what you want to do. This means typing something, then pressing Enter to run a command. Commands generally follow this pattern:
command [options] [arguments]- command: The action you want to perform
- options: Flags that modify how the command works (usually start with
-or--) - arguments: What you want the command to act on (like file names or paths)
For example, in the command ls -l Documents, ls is the command, -l is an option (to show detailed listing), and Documents is the argument (the folder to list). Notice that these are separated by spaces. ls-lDocuments simply will not work; it is not a valid command. When I verbally describe a command, I am not going to say “space” every time. Instead, I will exaggerate the pause between the command, options, and arguments. For example, I would say “elle ess” (long pause) “dash elle” (long pause) “documents” to refer to the command ls -l Documents.
Listing Files and Folders
To see what’s in your current directory, use the ls command (or dir in Windows Command Prompt):
lsThis shows a basic list of files and folders. You can add options to see more details:
ls -l  # Detailed list with file sizes, dates, permissions
ls -a  # Shows hidden files (those starting with a dot)
ls -la # Combines both options
Creating Files and Folders
Here are some useful commands for creating files and folders:
| Command | Description |
|---|---|
mkdir name |
Create a new directory/folder |
touch filename.txt |
Create an empty text file (Mac/Linux) |
echo "" > filename.txt |
Create an empty text file (Windows/Mac/Linux) |
Let’s create a helpful structure for our class and make the first file where we will write our code for Lab 1:
# Make sure you're in your bcog200 folder
# I'm assuming that you created the bcog200 folder on your Desktop
cd ~/Desktop/bcog200

# Make separate folders for the Labs and Homeworks
mkdir Labs
mkdir Homeworks

# Create your first lab file
cd Labs
touch lab1.py  # On Mac/Linux
echo "" > lab1.py  # On Windows
Viewing and Manipulating Files
| Command | Description |
|---|---|
cat filename |
Display the contents of a file |
head filename |
Show the first 10 lines of a file (Mac/Linux) |
tail filename |
Show the last 10 lines of a file (Mac/Linux) |
cp source destination |
Copy a source file to destination |
mv source destination |
Move or rename a source file to a destination file |
rm filename |
Delete a file (be careful, there’s no recycle bin!) |
rmdir directory |
Delete an empty directory |
rm -r directory |
Delete a directory and all its contents (use with caution!) |
rm -rf directory |
Same as above, skipping confirmation (beware!) |
The rm -rf command is especially dangerous. Quite famously, all of Pixar’s work to create Toy Story 2 was almost completely deleted by this command.
For example, to add content to our Python file and then view it:
echo "print('Hello, World!')" > lab1.py
cat lab1.py
Using a Text Editor in the Terminal
For more substantial editing, you can use a terminal-based text editor:
nano lab1.py # Simple editor, good for beginnersIn nano:
- Type to edit
- Use arrow keys to navigate
- Ctrl + O to save, then Enter to confirm
- Ctrl + X to exit
You can also open files in your graphical text editor from the terminal. For example, if you have VS Code installed (and have the code command added to your PATH), you can open a file called main.py by running:
code lab1.py # Opens in VS Code if installed and in your PATHRunning Python Programs
Once you’ve created a Python file (and when you have Python installed, as we’ll see in 0.4. Installing Python), you can run it from the terminal:
python lab1.pyUseful Terminal Shortcuts
| Shortcut | Description |
|---|---|
| Tab | Auto-complete file/folder names (huge time-saver!) |
| ↑ / ↓ | Navigate through command history |
| Ctrl + C | Cancel the current command |
| Ctrl + L | Clear the screen |
| Ctrl + A | Move cursor to beginning of line (Mac/Linux) |
| Ctrl + E | Move cursor to end of line (Mac/Linux) |
| Ctrl + U | Delete the entire line (Mac/Linux) |
Exercise: Practice Using the Terminal
Let’s apply what we’ve learned with a hands-on exercise:
- Open your terminal
- Navigate to your
bcog200folder - Create a new folder called
terminal_practice - Inside that folder, create a file called
hello.py - Add the following code to the file:
print("I'm using the terminal!") - Optional: if you have Python installed already, run the Python file with
python hello.py - Create a new subfolder inside
terminal_practicecalledbackup - Copy
hello.pyto the backup folder - List the contents of the backup folder to verify the file is there
See below for spoilers:
Exercise solution — only expand when you’re done or utterly stuck
cd ~/Desktop/bcog200  # I'm assuming that your folder is on your desktop
mkdir terminal_practice
cd terminal_practice
# Below I'm using the terminal to write directly to the file; you don't have to do it this way!
echo "print(\"I'm using the terminal!\")" > hello.py
python hello.py
mkdir backup
cp hello.py backup/
ls backupIf you get stuck, don’t worry! Learning to use the terminal takes practice. Try using the --help flag with any command to see how it works (e.g., ls --help).
Additional Terminal Commands for Reference
Here are some additional useful commands that you might need later:
| Command | Description |
|---|---|
grep pattern file |
Search for a pattern in a file |
find directory -name pattern |
Find files matching a pattern within a dir |
chmod permissions file |
Change file permissions (Mac/Linux) |
sudo command |
Run command with admin privileges (Mac/Linux) |
zip archive.zip files |
Create a zip archive |
unzip archive.zip |
Extract files from a zip archive |
ps |
List running processes |
kill process_id |
Terminate a process |
Note that I’m making extensive use of placeholders in the commands above. For example, chmod permissions file will not work as written. You’ll need to replace permissions with the actual permissions you want to set, and file with the actual file you want to change. A real example might look like this: chmod 755 hello.py which changes the permissions of hello.py to allow the owner to read, write, and execute the file, and allow others to read and execute the file. You can learn more about permissions here but this is optional information (for now).
Terminal vs. GUI: When to Use Which
While we encourage you to practice using the terminal, it’s important to know when each interface is most appropriate.
- Use the terminal when:
- You need to run commands quickly
- You’re working with multiple files at once
- You need to automate repetitive tasks
- You need a high degree of control to do a specific task
- Use the GUI when:
- You need to visually browse through files
- You’re editing images or other visual content
- You’re more comfortable with point-and-click navigation for a specific task
Some programmers do everything on their machines without ever touching the mouse. For most of us, that’s aspirational; it’s fine to use the GUI for some tasks. You don’t have to be a vim1 master to be a good programmer!
0.3. Installing a Text Editor
In order to do any serious programming, you will need a text editor. As the name implies, this is a program that allows you to edit text. Of course, you have likely edited text many times before in your life, using programs such as Microsoft Word or Google Docs, or perhaps one of the basic editors that come installed on computers today (e.g., Notepad, TextEdit). However, none of these applications are suitable for programming. This is because files created and edited with these applications include information that is invisible to you, but used by the text editor to keep track of formatting, font information, and all kinds of other ancillary things. With that in mind, we are going to need to download a program that doesn’t have this esoteric issue. As a plus, many text editors are made specifically for writing computer programs and include all manner of features that help you along the way, like syntax highlighting (e.g., coloring the text depending on whether it is a keyword in the programming language) or automatic error detection. For now, we will pick a reasonable option to get started.
A basic (and free!) text editor is always a great program to have, even if you decide to use one with more advanced features later. So for this, we are going to start with Visual Studio Code (VS Code). VS Code is free and open-source, developed by Microsoft with contributions from the developer community.
Installing VS Code
- Go to https://code.visualstudio.com/
- Click the big blue “Download” button - it should automatically detect your operating system (e.g. “Download for Windows”, “Download for Mac”)
- Once downloaded, run the installer:
- Windows: Run the downloaded
.exefile and follow the installation prompts - Mac: Open the downloaded
.dmgfile, and drag the Visual Studio Code icon to your Applications folder. Eject the disk image after installation. DO NOT KEEP THE DISK IMAGE MOUNTED FOREVER - Linux: Follow the package installation instructions for your distribution
- Windows: Run the downloaded
Adding VS Code to Your PATH
Being able to open VS Code from the terminal using the code command is extremely useful. You can set it up like so:
- Open VS Code
- Press Cmd+Shift+P (Mac) or Ctrl+Shift+P (Windows/Linux) to open the Command Palette
- Type “shell command” to search, and select “Shell Command: Install ‘code’ command in PATH”
- Restart your terminal so that the installation takes effect
You can test if it worked by opening your terminal and typing:
code --versionIf you see a version number, the installation was successful! You can now use commands like code . to open VS Code in the current directory, or code myfile.py to open your specific file (again, note the use of a placeholder).
Think of the PATH as your computer’s address book. When you want to run a program like Python or VS Code or anything else from the terminal or command line, your computer looks to the PATH first to figure out where that command or file lives. All important programs accessible via the command line must be indexed in your PATH. For the purposes of this course, you shouldn’t have to worry too much about the PATH, but if you do run into any PATH issues, simply ask us for help in class or at office hours.
Note well: here we are talking about the PATH, all upper case — when we speak of “paths” or “a path” or a “file path” we are simply referring to the exact location(s) of files or folders. PATH != “path”
Essential Extensions
One of the best features of VS Code is its extensibility. You can install extensions using the Extensions menu, which you can access by clicking the Extensions icon in the left sidebar (it looks like four squares, with three of the squares making an L-shape, and the top right square floating away from the rest, up and to the right) or pressing Cmd+Shift+X / Ctrl+Shift+X while the sidebar is focused. Once in the Extensions menu, you can search for extensions by typing in the search bar at the top of the menu.
Python Extension
- Enter the Extensions menu
- Search for “Python”
- Install the official Python extension by Microsoft (it should be the first result, and it will have a blue checkmark icon next to “Microsoft” as the publisher)
Black formatter
Black is a code formatter that automatically makes your Python code consistent and readable. This will save you a lot of heartache in the future! Once your code is written correctly, you can use the Black formatter to automatically format it whenever you save the file.
- Open the Extensions sidebar again
- Search for “Black Formatter”
- Install the Black Formatter extension (again, from Microsoft — frustratingly, it’s the third result for me, with over 4 million installations)
To set up Black as your default Python formatter:
- Open the Command Palette
- Search for “Preferences: Open User Settings (JSON)”
- Add these lines to your settings:
{
  "editor.formatOnSave": true
}
Note that these settings use JSON (JavaScript Object Notation), not Python. This means that the settings file needs to have one curly brace at the beginning, one at the end, and your options are a series of key-value pairs, with commas at the end of the line if you have multiple entries. Keys are strings in double quotes (single quotes are not allowed!), and values can be strings, numbers, or booleans (lower-case true and false are used in JavaScript, unlike in Python where True and False are used). If in doubt, you can copy and paste the above code into your settings.
Other Useful Extensions
There are myriad extensions on offer, so I won’t go into all of them. However, two that I have found useful are Rainbow CSV (which makes it easier to read and edit CSV files in the editor) and indent-rainbow (which makes it easier to spot indentation). Feel free to install those if you like.
Using the Command Palette
As a powerful text editor, there are many, many commands you can use in VS Code. It is impossible to remember them all. When you need to find a command, the Command Palette is your go-to tool. In fact, we’ve already used it earlier to install the code command to your computer’s PATH. You can access the command palette with:
- Mac: Cmd+Shift+P
- Windows/Linux: Ctrl+Shift+P
Some useful commands to try:
- Type “Python: Select Interpreter” to choose your Python version (if you’re using conda, you can select your
bcog200environment, for example) - Type “Format Document” to manually format your code
- Type “Terminal: Create New Terminal” to open a terminal inside VS Code
You can use the Command Palette to discover new features. Just start typing what you want to do, and VS Code will show you matching commands!
Verifying your setup
Let’s make sure everything is working:
- Open VS Code
- Create a new file called
test.py - Add this code:
def greet( name):
    print( f"Hello, {name}!"  )

greet("World")- Save the file
- The code should automatically format (removing the extra, unnecessary spaces) and look like this instead:
def greet(name):
    print(f"Hello, {name}!")

greet("World")- You should see Python syntax highlighting, with text colored differently depending on their meaning
- If you hover over Python code (e.g., the print command), you should see type hints and documentation
If all of these work, your VS Code setup is ready for some productive programming!
0.4. Installing Python
There are several ways to install and manage Python on your computer:
- System-level installation: Installing Python directly on your operating system
- Package manager installation: Using tools like Conda (Anaconda/Miniconda)
- Modern Python tooling: Using newer tools like
uv
For this course, we’ll be using uv, a modern, high-performance Python package installer and environment manager. Here are a few reasons why:
- Speed:
uvis significantly faster than traditional tools likepipandconda - Reliability: It creates reproducible environments with precise dependency resolution
- Simplicity: It’s easier to understand and use than more complex alternatives
- Modern approach: It represents the direction Python tooling is headed
One major advantage of uv is that you don’t need to install Python first - uv can manage Python installations for you!
A “virtual environment” is essentially a folder (often called .venv) that contains a specific version of Python and a set of packages specific to that version of Python, designed to be isolated from the rest of your system, for use in a particular project. When you activate a virtual environment, your terminal will make use of that version of Python and the packages installed in it, rather than whatever other version(s) of Python you may have installed on your system.
Step 1: Install uv
Let’s start by installing the uv tool using your terminal. Choose the appropriate instructions for your operating system below.
Windows
In PowerShell, run:
powershell -ExecutionPolicy ByPass -c "irm https://astral.sh/uv/install.ps1 | iex"Mac/Linux
In Terminal, run:
curl -LsSf https://astral.sh/uv/install.sh | shIf you don’t have curl (in other words, if you get an error by running the above command), you can use wget:
wget -qO- https://astral.sh/uv/install.sh | shBoth platforms
After successfully installing uv, quit and reopen your terminal to ensure uv is in your PATH.
Note that if you are on Mac, quitting a program is done by pressing Cmd + Q. Simply pressing the red “X” at the top left of the terminal only closes the window in front of you; it does not quit the program itself. (On Windows, clicking the red “X” at the top right will, indeed, quit the program, but you can also use Alt + F4 to quit any given program using the keyboard.)
Step 2: Verify uv Installation
To verify that uv was installed correctly, first quit your terminal program and open a new terminal window. Then, run:
uv --versionYou should see the current version of uv displayed. For example, on my machine, I see:
uv 0.7.3 (3c413f74b 2025-05-07)Step 3: Pin our version of Python to 3.13 globally
Sometimes when we install uv, for whatever reason it will default to using a different version of Python than the one we will use for this class. To get around this, we can pin our version of Python to 3.13 globally.
uv python pin 3.13 --globalThis ensures that all projects use Python 3.13 by default.
Step 4: Initialize Your Project
Now we’ll use uv to initialize a proper Python project for our course work. This will help us manage dependencies and make your code more reproducible.
# Navigate to your course folder
cd ~/Desktop/bcog200

# Initialize a Python project with uv
uv init
The uv init command creates several important files:
pyproject.toml: A standardized configuration file that describes your project and its dependencies.python-version: A text file that says which version of Python to useREADME.md: A text file (written in Markdown) that tells the reader what your project is and how to use itmain.py: A Python script that is the entry point for your project (just a placeholder)
Every modern Python project needs these files (and more!), so this is a good place to start.
Before we move on, we need to take a closer look at two of those files to make sure that your project is set to use the right version of Python. First, open your pyproject.toml file; it should look something like this:
[project]
name = "bcog200"
version = "0.1.0"
description = "Add your description here"
readme = "README.md"
requires-python = ">=3.13"
dependencies = []
The important line is the requires-python line, which tells uv which version of Python to use. Make sure yours says requires-python = ">=3.13" so that it uses the right version of Python in the next step.
Next, open your .python-version file. It should be pretty barebones, just stating the version number (which should match the requires-python line in your pyproject.toml file):
3.13If it doesn’t say 3.13, make it so. (You can also use the command uv python pin 3.13 to accomplish the same goal, but doing it manually seems more approachable.)
Step 5: Create a Virtual Environment
Next, we’ll create a virtual environment for our project:
uv venvThis command does two important things:
- If you don’t already have Python 3.13 installed,
uvwill download and install it - It creates a virtual environment in the
.venvfolder that uses that Python version
You can also be more verbose about it and specify the exact version of Python to use and where to put it:
uv venv .venv --python 3.13But since we went to the trouble of specifying the version of Python to use in the previous step, an unadorned uv venv should suffice.
Step 6: Activate the Environment
After creating the environment, you need to activate it:
# On Windows:
.venv\Scripts\activate

# On Mac/Linux:
source .venv/bin/activate
When the environment is activated, you’ll see (.venv) at the beginning of your command prompt.
Step 7: Install and Track Packages
Now we’ll install packages and track them in our project configuration:
# Install packages and track them in pyproject.toml
uv add numpy pandas matplotlib jupyter
This command:
- Installs the latest versions of these packages
- Updates your project’s dependency list to include them
To see what packages are installed, you can run:
uv pip listuv pip command
The uv pip command is a wrapper around the pip command that is included in the Python installation. It is used to install packages and track them in our project configuration. It’s saying, “Hey uv, use pip to do the following command for me.” Many such commands are available in the uv tool, always prefaced with uv. In this case, uv pip list is the same as pip list.
Understanding Project Files
Let’s examine the files created by uv init:
pyproject.toml
This is the modern standard for Python project configuration. If you open it, you’ll see something like:
[project]
name = "bcog200"
version = "0.1.0"
description = "Add your description here"
readme = "README.md"
requires-python = ">=3.13"
dependencies = [
    "jupyter>=1.1.1",
    "matplotlib>=3.10.3",
    "numpy>=2.2.6",
    "pandas>=2.2.3",
]
This file makes it easy to:
- Share your code with others
- Ensure everyone uses the same versions of packages
- Install all dependencies with a single command
For this course, it would be helpful to use Python 3.13 (or higher, assuming all the packages you need are compatible with it). By pinning the Python version to 3.13 globally, we should have ensured that all projects use Python 3.13 by default. However, if your environment is still using a lower version (e.g., 3.12, 3.11, etc.), then you have two ways to fix the issue. The first is to edit the requires-python entry in your pyproject.toml file to the version you want, then run uv sync to update your environment to match the new version.
The second way is to recreate your virtual environment from scratch with the version you want. This is a two-step process:
- First, delete the
.venvfolder (if it exists) - Then, recreate it with:
uv venv .venv --python 3.13
Once you have done one of these (no need to do both), you can verify your Python version by using uv run python --version which will print the version of Python you are using to the terminal.
requirements.txt
This file contains the exact versions of all installed packages, which helps ensure reproducibility. You can update it with:
uv pip freeze > requirements.txtUsing uv Going Forward
Here are some common uv commands you’ll use throughout this course:
- Install a package and track it:
uv add package_name - Install packages from requirements.txt:
uv pip install -r requirements.txt - Update a package:
uv add --upgrade package_name - Remove a package:
uv remove package_name - Run a Python script:
uv run python script.pyorpython script.py(after activating your environment) - Update lockfile:
uv lockoruv pip freeze > requirements.txt
Shell Autocompletion (Optional)
To make it easier to use uv with tab completion, you can set up shell autocompletion:
Bash
echo 'eval "$(uv generate-shell-completion bash)"' >> ~/.bashrcZsh
echo 'eval "$(uv generate-shell-completion zsh)"' >> ~/.zshrcPowerShell
if (!(Test-Path -Path $PROFILE)) {
  New-Item -ItemType File -Path $PROFILE -Force
}
Add-Content -Path $PROFILE -Value '(& uv generate-shell-completion powershell) | Out-String | Invoke-Expression'
Alternative Approaches (Not Required for This Course)
If you choose not to use uv there are other ways to install Python and manage the environments with which you will work. Below are some of the more popular options. Do not double-up on these! If you’ve already installed uv, you don’t need to bother with this section. Simply pick your favorite method and roll with it.
System-level Installation
Directly installing Python on your operating system is simple but has limitations:
- Difficult to manage multiple Python versions
- Can lead to conflicts between packages
- Not as easily reproducible across different computers
Conda (Anaconda/Miniconda)
Conda is a popular package manager that:
- Creates isolated environments
- Manages non-Python dependencies well (especially useful for data science)
- Has a large ecosystem of pre-compiled packages
However, Conda has some drawbacks:
- Significantly slower than
uv - More complex to understand and use
- Takes up more disk space (especially Anaconda)
- Can sometimes have dependency resolution issues
If you’re already familiar with Conda and prefer to use it, you can do so, but the examples in this course will use uv.
Troubleshooting
Common Issues and Solutions
If you encounter issues with the installation, here are some common problems and their solutions:
“Command not found” errors: Make sure you’ve reopened your terminal after installation.
Permission errors:
- On Mac/Linux, you might need to use
sudofor some commands - On Windows, try running your terminal as administrator
- On Mac/Linux, you might need to use
PATH issues:
- Make sure
uvis in your PATH (see the section in 0.3 about the PATH) - On Windows, you might need to add it manually through System Properties > Environment Variables
- Make sure
Activation doesn’t work:
- If
activatedoesn’t work, make sure you’re using the correct path to the activate script - Windows uses backslashes:
.venv\Scripts\activate - Mac/Linux uses forward slashes:
source .venv/bin/activate
- If
Getting Help
If you’re stuck, here are some resources:
uvdocumentation: https://docs.astral.sh/uv/- Ask your instructor or TA during office hours
Exercise: Set Up Your Python Environment
Before moving on, complete these tasks to ensure your Python environment is ready:
- Install
uv - Pin our version of Python to 3.13 globally with
uv python pin 3.13 --global - Navigate to your
bcog200folder and initialize a project withuv init - Create a virtual environment that uses Python 3.13
- Activate the environment
- Install the packages:
numpy,pandas,matplotlib, andjupyter - Make sure your dependencies are tracked in
pyproject.toml - Check that your python version is 3.13 by running
python --version - Run a simple Python program to verify everything is working:
Exercise solution — only expand when you’re done or utterly stuck
curl -LsSf https://astral.sh/uv/install.sh | sh
uv python pin 3.13 --global  # ensures that all projects use Python 3.13 by default
uv init
uv venv .venv --python=3.13
source .venv/bin/activate
uv add numpy pandas matplotlib jupyter
cat pyproject.toml
python --version
python hello_world.py  # or some other very simple program
# Save this file as test.py in your bcog200 folder. Naturally, you do not need this comment in the file itself.
import numpy as np
import pandas as pd
import matplotlib.pyplot as plt
print("Python is working!")
print(f"NumPy version: {np.__version__}")
print(f"Pandas version: {pd.__version__}")
# Create a simple plot
plt.figure(figsize=(6, 4))
plt.plot([1, 2, 3, 4], [1, 4, 9, 16], 'ro-')
plt.title('A Simple Plot')
plt.savefig('test_plot.png')
plt.close()
print("If you can see this message and a file called 'test_plot.png' was created, everything is working correctly!")Run the program with:
python test.pyIf you can see the message in your terminal and see a plot image created in the folder, you’re all set!
Moving forward, we’ll be using the uv tool regularly to install packages and manage our project. You will generally want to activate your environment with source .venv/bin/activate before running any Python code (and you should see (.venv) or (bcog200) at the beginning of your command prompt as proof that you’ve done this correctly). Alternatively, you can accomplish the same task without activating the environment yourself by using uv run python my_script_name.py to run your particular script.
0.5. Code vs. Comments
Now that you have Python installed and have created your first Python program, we can start getting into details.
A Python file can have code and comments. Code is the commands that are run by the Python app. Comments are lines that Python ignores, so you can use it to add notes and documentation to your programs. Below is an example of a simple Python program with code and comments.
# this is a "Hello World" program.
# It is often the first program we write in a language
# so that we can make sure everything is working correctly.

print("Hello World!")  # this line has code and comments
There are several different ways you can create comments in a Python program. The first way, as shown above, is using the # symbol. Python ignores everything on a line that comes after a # symbol. If the symbol is at the beginning of the line, as on the first three lines, then the whole line is ignored. You can also put the # on the same line as the code, and everything after the # will be ignored. Good programming practice is to use the latter type sparingly, only for lines that really need explaining.
One limitation to the # symbol is that it only comments out a single line, and so if you want to write a multi-line sequence of comments, like a description of the whole program, then it is annoying to have to put a # over and over. You can create a multi-line comment using sets of three single or double quotes.
"""
Here is a multi-line comment.
I can write as many comments as I want without needing more comment symbols.

I can still use single quotes in the comments, and it stays a comment:
'This is a quoted sentence'
Just be careful not to put three in a row unless you are ending the comment
block.
"""

x = 5
print(x)

'''
Single quotes work the same way. you can use single quotes ' or double quotes
" in the comment block, but again just be careful not to use three of the
same type in a row.
'''
We will talk more about the proper use of comments later. But using comments is very important because it helps others understand your code, and helps you understand your own code if you haven’t looked at it in a while. Another trick to remember is that if there is some code that you have written in a program, but you want to temporarily prevent it from running while you work on another part, you can just comment it out (turn it into a comment). Most text editors will let you toggle comments via a keyboard shortcut, the most common being CTRL + / on Windows and CMD + / on a Mac.
Some people think that comments are a waste of time because computers ignore them. Some say that the best comments are self-evident; that is, the code itself should be so well written that it should be easy to understand without the need for comments. It is also the case that comments may not be kept up-to-date as changes are made to programs, so that they end up actively impeding understanding. I agree with this to some extent, but I also think that comments are useful for explaining why something is written the way it is, and for explaining the big picture of what is going on in the code — even if the code itself should be written so that the meaning is self-evident.
0.6. The Interactive Shell
So far, when we have run Python programs, you have typed python followed by a file name (e.g., python filename.py). You can, however, just type python in the terminal without a file name and this will open what is referred to as the “interactive shell.” (Assuming that you have activated your environment, of course; otherwise use uv run python instead.)
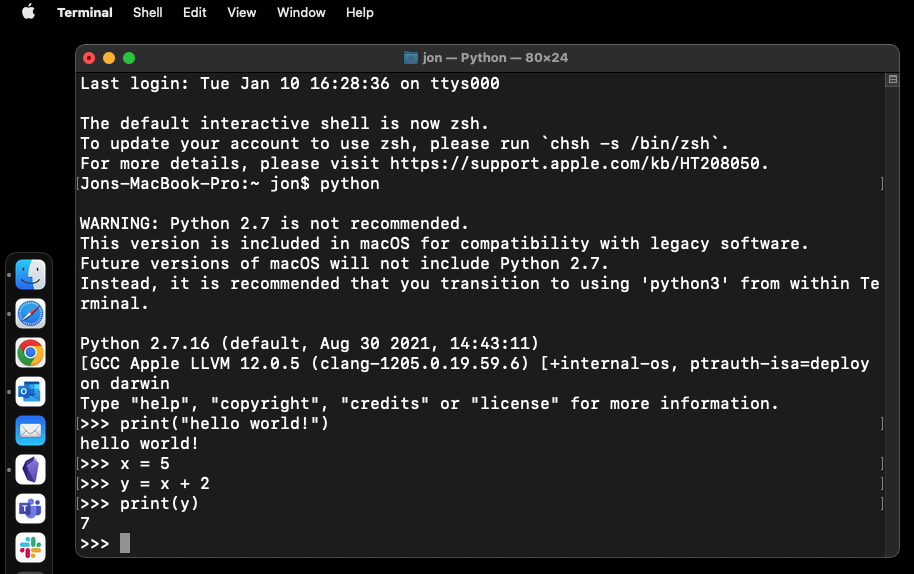
Note that the prompt has changed from something involving your computer name, user name, and path to just three arrows >>>. If you see the three arrows, you know you are in the interactive shell. In the interactive shell, you can type and execute Python commands one at a time.
The interactive shell can be a very useful and quick way to try out a line or a couple of lines of code to see if it works or to remind yourself how to do something.
When you are ready to exit the interactive shell and return to the regular Terminal prompt, just type exit() or CTRL + D.
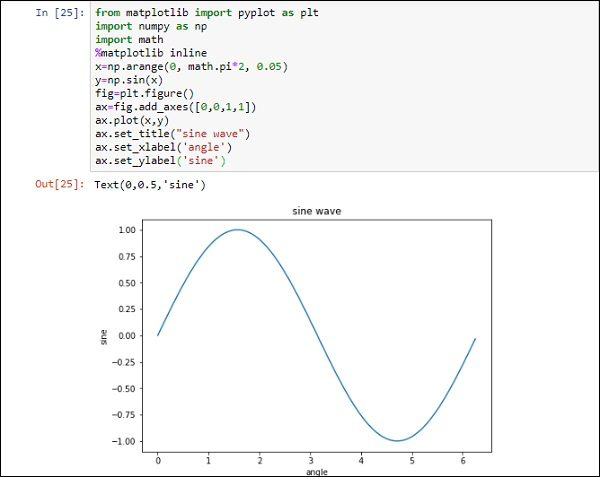
0.7. Jupyter Notebooks
Jupyter Notebooks are an alternative way of writing Python code where commands are written and executed in sets or sequences, with their result or output displayed in the same document.
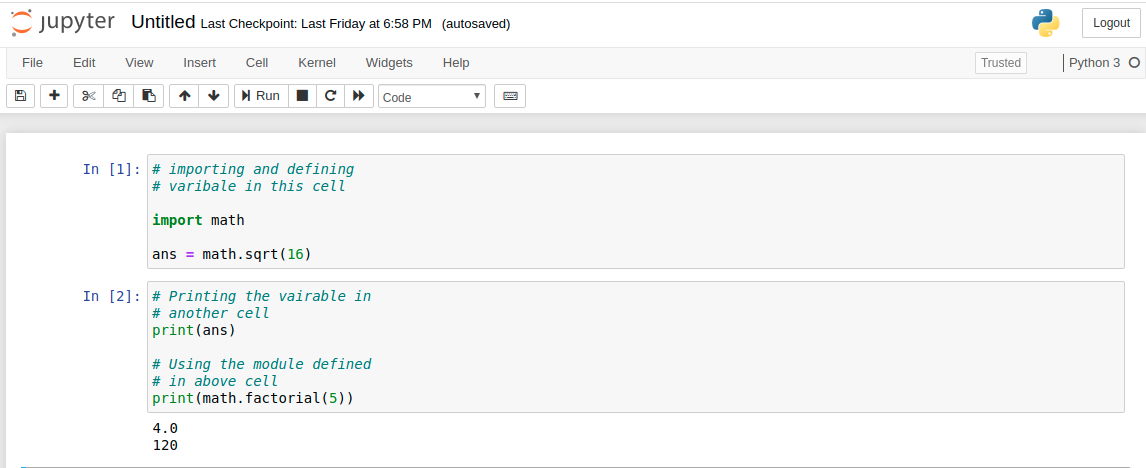
Similar to, but perhaps even better than, the interactive terminal, Jupyter Notebooks can be a very easy way to quickly create some code and see its output. It can be a nice tool for testing a simple idea, visualizing some output, or communicating the results of some code. I also use them to write my own manuscripts, as the code and results can be included in the document directly.
However, I am one of a large majority of people who think it is actually a mistake to introduce people to programming using Jupyter Notebooks or Jupyter Lab. Interactive editors like Jupyter Notebooks have a number of drawbacks for those who are first learning to code, including:
- They promote writing disorganized code
- They make it hard to experiment with multiple versions of the same code (since each individual code block must be re-run separately)
- They make it harder to ensure code reproducibility if the code is not always run in the same order. A script requires this, but in a notebook, you can run code blocks in any order. (I recommend always writing your notebooks so that they are designed to be run from top to bottom in order to produce the same results every time.)
- They can make it harder to find errors in code
- They do not play well with other tools you may want to use with your Python script
For those who are interested, here is a more detailed explanation of the drawbacks of the notebook approach to coding.
For these reasons and many more, we won’t be using Jupyter Notebooks to do assignments in this class. (However, sometimes I will use them for pedagogical purposes in class.) If you want to learn them on your own later, great! Once you have mastered Python programming using scripts, learning how to use a Jupyter Notebook will be easy, and you will then already have developed some of the good programming practices that will help you avoid some of the problems listed above.
0.8. Other Useful Tips
Creating Aliases
Aliases are shortcuts that let you run longer commands with shorter names. They’re particularly useful for frequently used commands or complex operations.
Mac (zsh)
Since macOS Catalina, the default shell is zsh. Here’s how to create aliases in zsh:
Open your terminal
Type
code ~/.zshrcto open your zsh configuration file (ornano ~/.zshrcif you prefer)Add your aliases at the end of the file, one per line. For example:
alias reload='source ~/.zshrc'
alias ll='ls -la'
Save and exit. If using
nano, you can do so by pressing CTRL+O, then Enter, then CTRL+XApply the changes by running
source ~/.zshrc
Instructions for systems using bash instead of zsh are exactly the same, except you’ll use ~/.bashrc instead of ~/.zshrc.
Windows (PowerShell)
In Windows PowerShell, you can create aliases in two ways:
Temporary Aliases (lasts only for current session):
Set-Alias -Name ll -Value "Get-ChildItem -Force"Permanent Aliases (persists across sessions):
Open PowerShell
Type
notepad $PROFILEto open your PowerShell profileIf the file doesn’t exist, create it by running:
New-Item -Path $PROFILE -Type File -ForceAdd your aliases to the file:
Set-Alias -Name ll -Value "Get-ChildItem -Force"
Set-Alias -Name reload -Value "source $PROFILE"
Save the file and restart PowerShell
Note: The $PROFILE location is typically C:\Users\YourUsername\Documents\WindowsPowerShell\Microsoft.PowerShell_profile.ps1 (Again, pay attention to the placeholder present in the command above.)
Keyboard Shortcuts
One key to getting faster at programming is getting good at using keyboard shortcuts instead of needing to click around with the mouse a lot. Here are a bunch of examples that you should learn to do:
- Saving a file (CTRL/CMD+S), copying (CTRL/CMD+C), and pasting (CTRL/CMD+V) text.
Many text editors also have programming-specific keyboard shortcuts.
- One huge time saver is knowing that you can quickly turn multiple lines of code into comments (perhaps code that you want to make so it doesn’t run at the moment while you are testing something else). You can do this in most text editors by highlighting those multiple lines of code and then typing CTRL/CMD+/ (i.e., slash, the one on the key with the question mark).
- You can duplicate a line by typing Shift+Alt+⬇︎.
- You can move a line up or down by typing Alt+⬆︎ or Alt+⬇︎.
- Highlight a word and then press Ctrl/Cmd+D to highlight the next occurrence of the word. You can keep pressing it to highlight some or all occurrences and then edit all of them simultaneously.
Telling Your Editor to Use Your Virtual Environment
If you’re using VS Code to edit your Python files, you can tell it to use your virtual environment by opening the project folder in VS Code and then clicking the Python Interpreter dropdown in the bottom right corner of the window. This will give you a dropdown menu of all the Python interpreters on your system. You can select the one you want to use (e.g., .venv/bin/python) by clicking on it. Alternatively, you can open the command palette (press Ctrl/Cmd+Shift+P) and type “Python: Select Interpreter” to open the interpreter selection dialog.
This is important because it allows your editor to know which packages are available to you and to give you proper syntax highlighting and other helpful features (like pressing Tab to perform autocompletion).
Commonly misunderstood terms: environment vs. current directory
Up to now, we’ve used several key terms that are important to understand, but may sound similar to one another. These are the two that cause the most confusion, the most often.
Current directory (aka working directory)
Your “current directory”, “working directory”, or “present working directory” is the folder your terminal is “in” right now. When you run commands like uv run python my_script.py, your terminal looks for my_script.py inside the current directory (unless you give the command a different path).
You can always see your current directory with pwd, and you can change it with cd.
Environment (usually refers to a virtual environment)
Your “environment” is not the same thing as your working directory. Instead, it refers to the context in which your terminal is running, including which Python installation you’re using, what installed packages you have, and what variables are set and known to your terminal.
In this course, when we say “environment”, we typically mean the virtual environment created by uv venv, which creates a folder called .venv in your project directory.
Activating it (e.g., source .venv/bin/activate) changes what the python command points to, and which packages are available.
Two important points:
- You can be in the correct current directory but accidentally use the wrong environment (which can lead to errors, such as your Python installation not being able to find the packages you need, as with a “ModuleNotFoundError”).
- VS Code (or any editor) also needs to know both which directory to work in and which environment you want, which is why selecting the interpreter (via the command palette or the dropdown in the bottom right corner of the VS Code window) matters. You can tell VS Code which directory to work in by going to “File” -> “Open Folder” and choosing a given directory, or by using the terminal (already positioned in the correct directory) and typing
code .to open that directory in VS Code. (Recall that.means “where I am right now in this terminal window”.)
vim is a notoriously high skill ceiling text editor. It is extremely powerful and customizable, but it is correspondingly difficult to learn — even exiting the editor can be a pain, as alluded to in a variety of memes. Alas, I do not use vim, because I have not invested the time to learn it.↩︎